Halloween is the perfect excuse to let your creativity run wild—especially in the dessert department. If you’re a busy mom juggling costumes, trick-or-treat logistics and maybe a haunted-house movie marathon, you probably don’t want to spend hours baking.
That’s where these no-bake Halloween desserts come in: easy to assemble, fun to decorate, and totally party-ready.
Whether you’re prepping for a classroom treat, a playdate, or a cozy movie night at home, these sweets let you get festive without heating up the oven.
1. Halloween Candy Bark

You’ll love how this one transforms leftover candy into something whimsical and shareable. Melt down white or colored candy melts (or use white chocolate), spread it out on parchment, and press in whatever Halloween-themed candy you have: candy corn, pretzels, cookies, sprinkles.
The bonus? Kids can help and it almost feels like an edible craft. According to recipe sources, once the chocolate is melted you just set it in the fridge until it snaps and you’re done.
One of the biggest wins here: minimal cleanup, and you can customize it for varying candy preferences or dietary needs. Use dairy-free melts if needed, or simply swap in vegan candy pieces. It’s perfect for when you realize you need something fast but still festive.
Give yourself about 10-15 minutes of hands-on time, then 30 minutes of chill time, and you’ve got pieces ready to break and serve. Use a rimmed tray so it sets evenly and chipping won’t ruin the design.
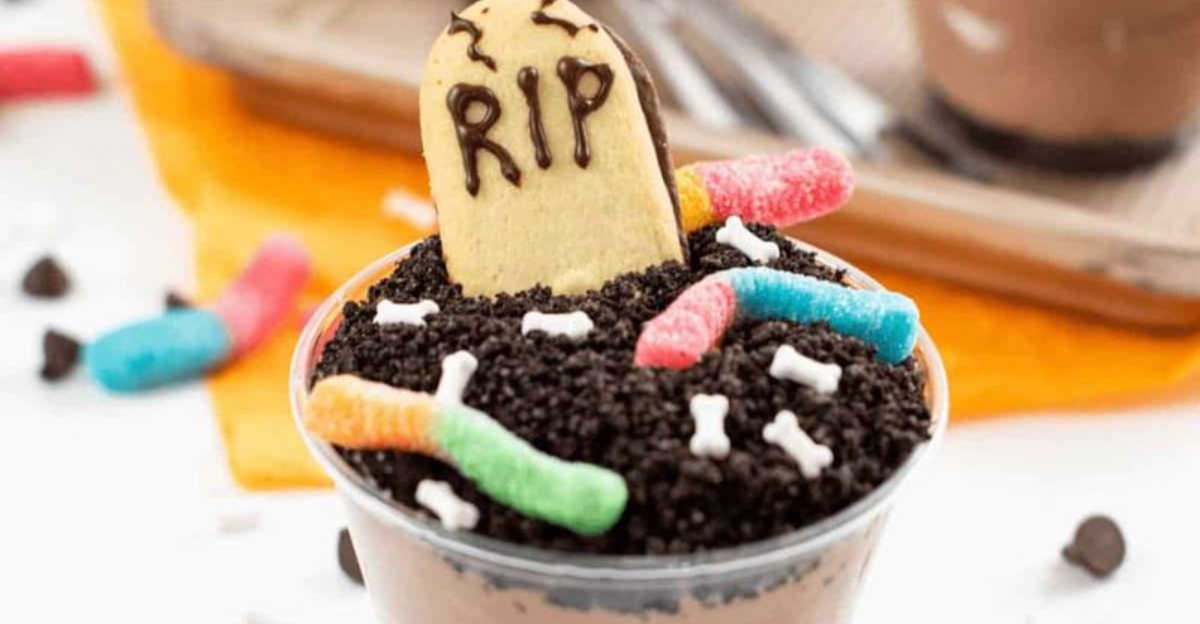
2. Graveyard Dirt Cups

This dessert nails the spooky aesthetic without stressing you out. Think layered chocolate pudding, crushed chocolate sandwich cookies (hello “dirt”), and gummy worms or cookie tombstones on top. It’s no-bake, super fun to decorate, and loved by both kids and adults.
What makes it extra mom-friendly: you can prep most of it ahead, keep things chilled, and even let the kids assemble their own little “graveyards” in clear cups. If you’re hosting, it makes an impressive display with minimal effort.
Pro tip: use clear disposable cups if you’re gearing up for a classroom or party where you don’t want to worry about returns. And crush the cookies in advance so assembly is quick.
3. Pumpkin Patch Dirt Cups

Imagine the same fun of layered pudding cups, but repurposed to look like a pumpkin patch. Swap in orange-tinted vanilla pudding for one layer and top with mini pumpkin candies. Your dessert table instantly has autumn flair.
Because the base is still pudding + cookie “dirt,” this dessert stays in the “no-bake, low-stress” category. It’s perfect for when you want something a little more dressed up than basic pudding, without diving into full dessert baking.
Let your kids help place the candy pumpkins on top—they’ll feel like mini stylists for the dessert. And if you’re prepping in advance, keep the decorative toppings separate until right before serving so your “pumpkins” don’t sink into moisture.
4. Mummy Oreo Truffles

These little balls of goodness bring major “cute” factor with very little fuss. The idea: crush sandwich cookies, mix with cream cheese or condensed milk, roll into balls, dip in white chocolate or candy melts, then pipe lines to look like mummy bandages. Add little candy eyes.
Because there’s no oven involved, you’re in business for last-minute treats or even gifting. They’re bite-sized, which makes them ideal for sugar-conscious kids or setting on party plates.
Tip: keep your hands cool (you’ll be handling melted chocolate) and have an assembly line going: crushing cookies, then mixing, then shaping, and finally dipping. You’ll breeze through them, and the payoff is huge.
5. Bat Oreo Truffles

Similar to the mummy version, but with a spooky bat twist. Use the same Oreo-mix base, then turn your dipped balls into bats: add almond or candy wings, draw little eyes or fangs, maybe top with a sprinkle of edible glitter or candy stars.
This switch-up is perfect if you already have the “base” materials from other treats. It saves time and lets you repurpose leftover cookies and candies.
These are especially great for a themed kids’ party—stick a small toothpick flag reading “Boo!” next to each one or place them in black cupcake liners for dramatic effect.
6. Witch Hat Cookies

Take a simple cookie—like a fudge‐stripe or similarly shaped—and turn it into a witch’s hat by adding a Hershey’s Kiss or other chocolate drop on top, secured with a dab of frosting, and then decorate with a little belt or icing.
Since you’re using store-bought cookies + candy + frosting, there’s no baking. But the visual is smart and fun for Halloween gatherings or classroom treats.
Let the kids help decorate: edible stars, orange or green icing accent, maybe a drizzle of melted chocolate. It becomes a mini station for them, which means less time you’re running around and more time you’re enjoying the fun.
7. Nutter Butter Ghosts

Go for a little ghostly charm with sandwich cookies, white chocolate/candy melts, and edible eyes. Dip the cookies in melted white chocolate, let them set, then add little eyes and maybe a mouth. Instant ghosts.
This takes store cookies and candy – no oven, no fuss – and yet the result is so fun and festive. Great for school treats, after-school snacks, or a cute addition to your Halloween dessert spread.
Tip: melt candy coating in short bursts in the microwave, stir until smooth, then carefully dip and tap off excess so your ghosts set cleanly. If you have a silicone mat or parchment, it makes cleanup easy.
8. Chocolate “Spider” Ritz Cookies

Take salt-ine or buttery crackers (like Ritz), sandwich them with peanut butter, dip in chocolate, and add pretzel “legs” and candy eyes to make spider shapes. A playful dessert without turning on the oven.
The contrast of salty cracker, creamy filling, and chocolate makes it taste like you did more work than you actually did. And when you decorate for Halloween, it becomes memorable.
Use mini pretzels for the legs, candy eyes (available in baking sections) for the face, and chill the pieces on parchment until set. Then stack them on a spooky platter and you’re party-ready.
9. Peanut Butter Spider “Buckeyes”

Roll peanut butter mixture into balls, dip in chocolate, then add pretzel legs and candy eyes to create little spiders. These are rich, fun, and super easy to assemble ahead of time.
They’re especially good for adults who appreciate the peanut-butter/chocolate combo, and the spider decoration keeps them on theme without going overboard.
Make them the day before, store in an airtight container in the fridge, and bring them to room temp a bit before serving so the chocolate isn’t rock-hard.
10. Halloween Rice Krispie Treats

Rice Krispie or crisp-rice cereal + melted marshmallows (or marshmallow fluff) + butter (or non-butter alternative) = base. Then shape them (brains, pumpkins, ghosts, etc.) or cut into bars and decorate with colored drizzles and candy pieces. Entirely no oven required.
This one is a childhood favorite revived for Halloween. It lets you mold fun shapes, add themed sprinkles or candy eyeballs, and have a treat that’s nostalgic and current.
Pro tip: line your pan with parchment for easier removal, spruce up the shapes with black or orange icing, and package extras in snack bags for after-school treat bags.
11. Monster Marshmallow Pops

Large marshmallows + candy melts in fun colors + candy eyes + sprinkles on sticks = instant Halloween pops. Kids can help decorate, and you’ll have little pops you can distribute at a party, hand out to friends, or tuck into lunchboxes.
No baking, minimal mess (set up a “decorate your own” station if you like), and the visual is adorable. Great for smaller hands to handle.
To keep them upright while setting, use a styrofoam block or a vase filled with dry beans so they don’t tip over while the coating hardens.
12. Witch-Finger Pretzel Rods

Stretch out mini or regular pretzel rods by dipping them in green candy coating (or tinted white chocolate), adding an almond “nail” tip, and perhaps a sprinkle of edible glitter. Instant witch fingers.
This dessert is especially good for playdates or when you want something spooky but not ultra-sweet (the salted pretzel gives a nice contrast). Also, it gives a decorative element: stand them in a cup or jar and they double as decor.
You can assemble ahead of time and store in a cool location until serving time. If you’re traveling with them, wrap loosely so the coating doesn’t chip.
13. Monster Popcorn / Popcorn Balls

Take plain popped popcorn, toss it with melted marshmallow or candy-melt binding, add candy-eyes, sprinkles, maybe colored drizzle. Form into balls or serve in cups for a thematic twist. All no-bake.
This one is great for a gathering where you want something shareable and light. The texture is fun, the decorations are playful, and you can make big batches easily.
If you’re making popcorn balls, press firmly so they hold shape, wrap them individually for grab-and-go, and watch them disappear fast.
14. Caramel Apples

Classic, but you can skip the candy coating oven step by using pre-melted caramel or caramel bits that you melt in the microwave, then dip apples and roll in toppings (nuts, sprinkles, chocolate drizzle). No baking required.
They’re visually striking (hello shiny caramel + stick + toppings), and they double as a take-home treat for guests if you wrap them in cellophane bags. Cheap, fun and effective.
Tip: choose firm apples, wipe them dry before dipping (moisture prevents caramel adhesion), and set them upright in a shallow tray lined with parchment until the coating sets.
15. Monster Apple Bites

Slice apples, spread with peanut butter (or other nut or seed butter), sandwich with another slice, then decorate with candy-eyes and maybe a small piece of fruit or candy for a tongue or mouth detail. No baking.
Perfect for when you want a slightly better-for-you dessert option that still fits the Halloween theme. Kids get the novelty, you get the apple base, which is a win.
Prep ahead by assembling and refrigerating, then add the “faces” just before serving so the decorations don’t slide or melt. Serve on a fun Halloween-patterned plate to amp up the theme.
16. Candy Corn Fudge

Use a microwave-friendly no-bake fudge recipe (often white chocolate + sweetened condensed milk + flavoring) and layer it in candy-corn colors: e.g., yellow bottom, orange middle, white top. Chill until firm, slice.
Visually it’s so striking—those classic candy-corn stripes—and it feels like you made something gourmet, but it’s actually super easy.
You can even tweak flavors (pumpkin spice in the orange layer, vanilla in the white layer, maybe caramel in the yellow). Chill overnight, slice next day, and you’re good.
17. Haystacks

Those classic clusters made from butterscotch chips or candy melts + peanut butter + chow mein noodles or cornflakes (or whatever crunchy you prefer). Mix, drop by spoonfuls, chill until set. Decorate like mummies or monsters by adding eyes or drizzle. No oven.
They’re fast, portable, and you can tailor the fluff factor (like extra marshmallows) depending on your crowd. Great for playdates, school treats or those “I need something now” moments.
Package them in individual wrappers if handing out, or serve on a tray. Kids love the crunch + sweet combo, and you’ll love how quickly they disappear.
18. No-Bake Spiderweb Cheesecake

Make a cheesecake-style dessert without baking: combine cream cheese, whipped topping, sugar, flavoring, pour into a crust (store-bought graham-cracker or cookie crust), chill until set. Then decorate with chocolate or fudge in a spider-web pattern and add a candy spider.
It gives you a “dessert table centerpiece” without turning on the oven. Make it the day ahead, then top it last minute. The spider web design is eye-catching and perfect for Halloween.
Serve it chilled, slice into wedges, and watch the “oohs” and “ahhs.” It’s elegant enough for adult guests, fun enough for kids, and still super simple.
19. Vampire Donuts

Use store-bought donuts (chocolate or glazed), insert plastic fangs (available at party or craft stores) or use edible vampire teeth picks, add candy-eyes or red icing “blood” drizzle. No baking required.
Easy, fun, and more playful than serious—perfect for little ones or a classroom party. And because you’re doing minimal work, you’ve got energy left for the rest of the Halloween prep.
Set them up on a tiered stand or spooky platter. You could even let kids “decorate their own vampire donut” station with different icing and sprinkles.